Showing posts with label Project: Altered Art. Show all posts

Friday, February 20, 2009

Girly Purse

my invented paper purse. the body is the typical mirrored image trapezoid. the handle was a traced a cigar box handle. the sides were tricky because i wanted it to expand when opened so things can be put inside, so i made my own design with geometrically based scored flaps.

Paper: Making Memories

Monday, November 5, 2007

Wednesday, August 1, 2007

Ebay Store

DH is not very happy with all my scrapbooking and paper craft goodies taking over the house. Now I have to use another room for my hobby. He agreed on the condition that I have to get rid of some of my stuff and budget the allotted space I have. So as much as I'm very hesitant to part with my art work, I have to. I'm slowly selling some at ebay. All profits will also go towards Hope4Children, the children's foundation that I have set-up to send books and toys to third world countries. TFL!

see also our affiliate company: http://www.dreamweavergiftbaskets.com/

Sunday, July 29, 2007

BFF Chipboard Album

an intricately designed best friend album for our auction. it has several pages with many goodies embedded throughout. it has sections for journaling, pictures, some pull-outs, etc.

this one took a bit longer because of all the embellishments i included and i try to use my scraps as much as possible to be frugal. but i've learned some several helpful shortcuts along the way. for example, painting the purse handles instead of covering it with paper; having pre-made embellishments sorted out by themes (e.g. chipboards glittered, colored and ready to be affixed; titles done, etc); color code scraps in a plastic baggie for easy mat placements, among others. what about you guys? any shortcut tips in making chipboard albums?

Saturday, July 28, 2007

Altered Wooden Boxes Collection Slideshow

a slide show highlighting some of my altered art wooden boxes collection

Altered Wooden Keepsake Box


Here's another altered art using a wooden box from Michaels. I like this box because it has embossed design on top which was fun to chalk. Wooden boxes are cool to paint over. Tins are tricky - you need to apply several paint layers and wait in between drying times.

The butterfly on the right is an after thought but still fit perfectly with this motif and material. Got some laser cut wooden designs from ebay and am having fun coloring them with acrylics, pastels, chalks, etc. For this project, I put fluid chalk in two shades. The paper is from K & Co's new line. For the inside, I used acrylic and pigment inks and paper. A plain inside doesn't quite look completely made!

Altered Trio of Mini Wooden Purses

Here's a cute collection of wooden purses covered with matching patterned papers and embellished with ribbons, flowers, etc. Very easy and fast to do!

Materials: wooden boxes from Michael's; imaginese papers; doodlebug alphas

Friday, July 27, 2007

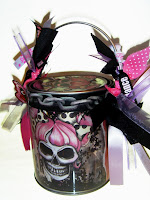
Altered Art: Hip Skull Girly Paint Can

The fastest altered art i've done. I had only 15 mins to do this for an on the spot altered art contest because I was late to the local NSD gig. But I was one of the 3 winners and received goodies for the contest.

Here are some tips to do this under 15 minutes:

1) To hide the imperfect alignment of paper agains the edge of the can inside, I put a sticker border on the outside! This can is a bit harder to work with because you have to put the design inside the clear platic can. It's eventually cool because your work gets protected.

2) To help with organization, have pre-sorted and matching scrapbook plain and patterned papers, embellishments planned, sayings and quotes. Sometimes the hardest part is not the technique and execution, but the design, theme, and composition.

Materials: Creative Imaginations papers, stickers, ribbons. Other ribbons from various companies.


see matching girly gift baskets on affiliate company: http://www.dreamweavergiftbaskets.com/

Altered Art: Yellow Floral Decor Canisters


K & Co papers (Hodges Line) were on sale so I grabbed several and made coordinating altered canisters and round boxes for future summery parties. The canisters will hold potpourri and candles. The big box can hold treats such as candy, party favors, and much more, I'm sure. For now, the set functions nicely as a home decor in my lovely craft room. The small canisters are old crafts containers. The big box was a gift box for a china.

Altered Art Passion: Cherry and Vines Lunchbox Ensemble

i've recently discovered the joy of altered art and i'm addicted to it now! i got some chipboards, paper mache's, wooden boxes, etc. to alter. i like expanding my repertoire of skills pertinent to paper crafts. here are some stuff i recently made. what do you think?

this is my cheery and sunny cherry ensemble. dh and i were grocery shopping at wholefoods one day (love this healthy store - but prices are incredibly prohibitive!) and bought tons of cherries which is one of my fave fruits. he bought me some fresh flowers also. what a nice dh, huh? i went home and made a fruit and flower arrangement. flowers, fruits, paper, art, bright colors always have a way of perking me up when i'm feeling blue which has been annoyingly quite often. i was inspired by my cherries and daisies arrangement to do an altered art using a tin lunchbox. i had extra scraps and being the frugal cropper, i then did some matching cards and tags.

i got good compliments from fellow scrappers and they also asked me some tips on how i "perfectly" cover my altered projects and what's the best adhesive to use. my answer was i approximate the length of the paper i need to cut then just start trimming edges off until i get the bext alignment. i also discovered using acrylic paints for the hard to reach places. i kept the front plain b/c i was lazy to cut around the edges of the metal clips (usually "professionals" unscrew the metal tags but that's too much work. i use pointed q-tips to help me navigate through the tricky nooks and crannies parts. the ribbon around is really a trick to mask smudges.


i'm really picky with craftsmanship so i rework areas until they look near perfect. the adhesive i like to use is glue stick., it's cheaper, lasts longer and can fill in hard to reach spaces. also, have a bone folder handy. the pointed side is good to "tuck in" the edges and the flat side helps me smooth out the air bubbles. the paper is from chatterbox's scrap walls, mistletoe vine. i also used some matching cherry stickers set from creative imaginations which go well with this line.